Pi-Pan README
|
NOTICE! You can Raspbian images with the Pi-Pan software pre-installed at the bottom of this page. |
|
Required Operating System for Pi-Pan
Pi-Pan works with standard Raspbian distribution. |
Pi-Pan Software and installation
Download appropriate GZ file from following url, and move it on your Raspberry Pi:
http://www.mindsensors.com/largefiles/pi-pan-2017-Stretch.tar.gz (For RPi 3 Model B)
http://www.mindsensors.com/largefiles/pi-pan-2016-Jessie.tar.gz (For RPi 3 Model B)
http://www.mindsensors.com/largefiles/pi-pan-2015-Jessie.tar.gz (For RPI 2 or RPi B+ with 2015 or newer Raspbian Jessie images.)
http://www.mindsensors.com/largefiles/pi-pan-for-2015-wheezy.tar.gz (For RPI 2 or RPi B+ with 2015 or newer Raspbian Wheezy images.)
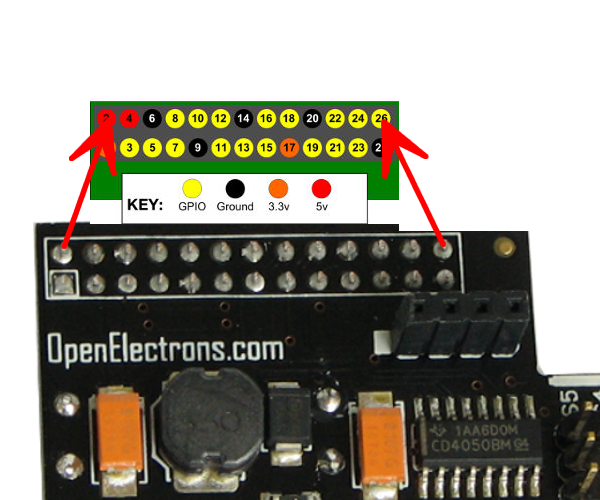 |
How to Connect Pi-Pan board on your Pi The Pi-Pan controller board connects on the Pi as in adjacent picture. (On all models of Raspberry Pi, Pin 2 is the corner pin). |
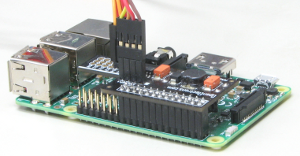 |
Note how the PiPan Board fits on Pi |
 |
Before you assemble Pi-Pan head assembly Bring the servos to neutral position. To do that:
cd pi-pan
python ./neutral_servo.py
Assemble Pi-Pan with instructions from url below: http://www.mindsensors.com/content/27-assembly-instructions-for-pi-pan-kit |
After you assemble the Pi-Pan assembly
Check that you have connected servo pins correctly.
To check Pan servo, run following command:
python ./check-pan.py
To check Tilt servo, run following command:
python ./check-tilt.py
Try the demo program, run following command:
python ./demo-pi-pan.py
| To Use Pi-Light First pin on Pi-Light connector has a White square background. Also there is a White square near the first pin on controller board. While connecting cable from Pi-Light to controller board, ensure that the pins with White square backgrounds match on both ends. To install required packages and enable I2C support, run following: cd pi-pan sudo ./install-pilight.bash Restart your Raspberry Pi to finish configuration, run command: sudo reboot To check that Pi-Light is working, run: python ./check-pilight.py |
| Troubleshooting Pi-Light (Optional) Install I2C tools for troubleshooting, using following command: (i2c-tools are not needed for Pi-Light to function). sudo apt-get install i2c-tools To check for i2c device. run following command: (I2C address of Pi-Light is 18.) For Model B: sudo i2cdetect 1 For Model A: sudo i2cdetect 0 result should look like this (address 18 indicates Pi-Light is found there): WARNING! This program can confuse your I2C bus, cause data loss and worse!
I will probe file /dev/i2c-1.
I will probe address range 0x03-0x77.
Continue? [Y/n] y
0 1 2 3 4 5 6 7 8 9 a b c d e f
00: -- -- -- -- -- -- -- -- -- -- -- -- -- -- -- --
10: -- -- -- -- -- -- -- -- 18 -- -- -- -- -- -- --
20: -- -- -- -- -- -- -- -- -- -- -- -- -- -- -- --
30: -- -- -- -- -- -- -- -- -- -- -- -- -- -- -- --
40: -- -- -- -- -- -- -- -- -- -- -- -- -- -- -- --
50: -- -- -- -- -- -- -- -- -- -- -- -- -- -- -- --
60: -- -- -- -- -- -- -- -- -- -- -- -- -- -- -- --
|
|
Troubleshooting Image
http://www.mindsensors.com/largefiles/2017-09-07-Stretch-with-pi-pan.zip (Stretch pre-installed with pi-pan and pi-light software. Use this for RPi 3 Model B)
Unzip the file, and set up your SD card. To setup SD card, follow instructions from http://elinux.org/RPi_Easy_SD_Card_Setup (refer to 'Create your own' section). |